Cricut Weld vs. Attach: Everything You Need To Know
Are you wondering the main difference between the Cricut Weld and Attach in Design Space? Here are things you need to know about Cricut Weld vs. Attach. Once you understand these Cricut Weld vs. Attach tools, Cricut Design Space will be easy to use and a lot of fun! You can use the program better with your Cricut machine and create designs more quickly.
Today, we will discuss two functions within the Cricut Design Space that often get confused: Weld vs. Attach tool. Also, we will tell you the process of when to use them. Let’s focus on the Weld and Attach tools within the Cricut Design Space.
Cricut Weld vs. Attach in Design Space
Cricut Weld and Attach may seem similar at first, but they give you different results when sending your design to the mat.
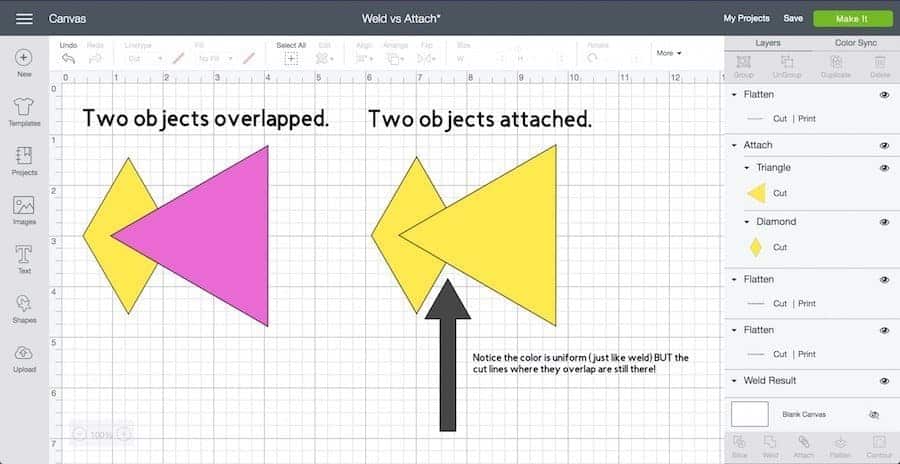
In short, the Attach Tool maintains shape in the same arrangement as when you send your design to the mat for cutting. The shapes are still separate pieces, but their layout is frozen.
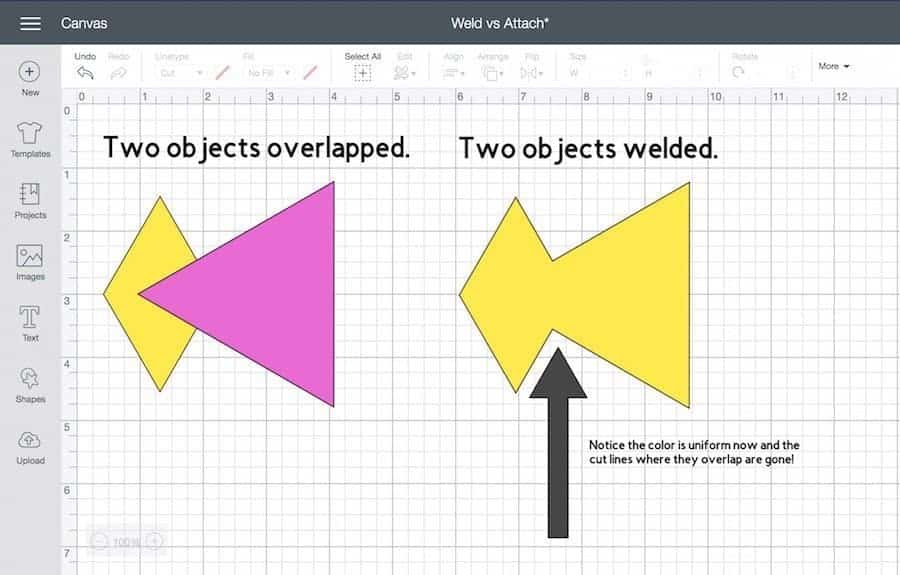
The Weld tool joins two or more different shapes into a single shape. The shapes are no longer separate but fused into a single shape. (The shapes don’t have to overlap to Weld together, which is where much confusion arises.)
Major Differences: Cricut Weld vs. Attach
Let’s discuss how these tools work and when you should use each.
Cricut Weld does what it says. This takes only 2 objects in Cricut Design Space and welds them together. Think about how you Weld with metal. This is done as a permanent blending of 2 pieces.
For Cricut objects, this removes the cut line where the 2 shapes overlap. It welds them together so that they are a unit or shape. You will not be able to undo this step after you hit the save button. Now, the program sees the shape as an object with a path around the outer edge that it cuts.
When To Use: Cricut Weld vs. Attach
You can use the Weld tool whenever you want to permanently join two or more different shapes into a single shape that you want to cut as one piece.
For example, you can use the Weld tool to join cursive letters so that they are cut as one piece. When you Weld overlapping letters, the lines between the letters disappear, and the different letter shapes merge into a single shape.
In addition, you can create more complex shapes by overlapping simple shapes found in the Cricut Design Space. Then, when you Weld them and send the resulting image to the mat, it will be cut into a single shape.
When you’re working on a project with different shapes or letters and want the layout to remain stable when you cut it out, you can use the Attach button to freeze the layout. If you’ve a multicolor design, you’ll want to attach pieces of the same color so they can be cut on the same mat.
Your design components do not need to be overlapping or touching to engage. And, even if they are overlapping, the Cricut will cut the attached shapes into separate pieces. You’ll know your images are attached because they will be labeled Attached in the Layers panel. Later, if you need to make layout changes, you can use the Detach button to unfreeze the layout.
Why Would You Use a Cricut Weld Tool?
The 1st reason to use the Weld tool is to create new shapes. You can make custom shapes using the Weld Tool. Most of the designs are made from basic shapes. You don’t want all the different pieces to be cut when you make new designs, so you’ll Weld them all together.
Another reason to use the Weld tool is to connect text. If you’ve a word that you want to cut as one piece rather than as individual letters, you will overlap them and then tap the Weld tool.
The 3rd reason to use the Weld tool would be so that you can use the Slice tool. You only need to have 2 objects to use the Slice tool. You can have a phrase you want to knock out (a white space around a design that overlays text). To do this, you’ve to use the Slice tool, and you can Slice with only 2 items. It means you’ve to Weld the phrase and then Slice the words and the picture once they’re correctly aligned.
Why Would You Use a Cricut Attach Tool?
The Attach tool looks like it would work similarly to the Weld tool. If you look at the symbol for the Attach tool, you will see that it looks like a paperclip. The best thing about this tool is you’re temporarily clipping design objects together. You can undo it by tapping on the Detach tool.
The reason to use this tool is to align the design the way it appears when cut. Your best interest is at the heart of Cricut. They’re trying to save money and craft materials by rearranging the objects so that all the items are squeezed into the top left side of the cut mat.
Saving material this way is a great feature if you’re cutting several singular objects. What if you want all letters to align with your preference’s symbol?
Attaching your objects will let the Cricut Design Space know that you like the arrangements you made and that you want them to stay that way. You want the design to be cut exactly as it appears on the screen. You may be thinking about using the Weld tool to put your items together permanently, and why worry about using the Attach tool.
The Weld tool is overkill. And it removes the paths around the designs, so they are all connected. Maybe you don’t want your designs to be connected, but you want them to stay in place.
This is the major difference when it comes to Cricut Weld vs. Attach tool!


Comments
Post a Comment